
Can I Get This Weird Japanese TV-PC Working Again? Revival Pt 2

Welcome back to another exciting installment of our tech revival saga! In this second part of the Panasonic CF32 restoration, affectionately dubbed “the Woody,” our host embarks on a mission to install Windows 95, transitioning from the original Japanese operating system. The goal? To revive this quirky TV-PC hybrid and restore its full functionality, bringing back the nostalgic charm of yesteryear.

Getting Started with Windows 95

The journey begins with some essential prep work, including the cleaning of the VGA connector, which ensures a properly functioning monitor. With everything connected and operational, our host dives into the installation process. However, the initial attempts to upgrade within Windows hit a snag due to compatibility issues with character maps, necessitating a clean installation instead. Undeterred, they pivot to installing Windows 95 directly from DOS, hoping to bypass the errors encountered earlier.

Copying Files and Drivers

After successfully installing Windows 95, our tech enthusiast faces the challenge of missing drivers. Drawing on their resourcefulness, they access the original Windows 3.1 system folder to retrieve crucial driver files, knowing that Windows 95 maintains backward compatibility. The process isn’t without its hiccups; file copying proves troublesome, prompting a switch to a Windows 10 PC to streamline the task. This clever workaround ultimately leads to a successful boot-up with all necessary files in place.

The Moment of Truth

With a few tweaks and a shortcut created for the AV media file, our host prepares for the big reveal. The excitement builds as they press the TV button, and to their delight, the screen comes alive with the familiar interface of Windows 95. The nostalgic feeling is palpable as they reflect on the potential adventures awaiting them, from hooking up a VCR to reliving the glory days of gaming with classics like Commander Keen.

Exploring Features and Future Plans

As the video progresses, the focus shifts to the multimedia capabilities of the CF32, showcasing its video features and multitasking abilities. Though some controls remain in Japanese, the host expresses optimism about future improvements, including potential RAM upgrades and the addition of a USB card. They also contemplate upgrading to Windows 98, possibly with an Intel Pentium Overdrive processor if they can snag a good deal.

Wrapping up the video, our host invites viewers to share their thoughts and encourages engagement through likes and subscriptions. The revival of this unusual device not only showcases the power of retro technology but also serves as a reminder of the joy found in restoring and repurposing vintage equipment. Stay tuned for more tech adventures as this project continues to unfold!

In this video we are able to install English Windows 95 and get the original Panasonic media software to work with it.

Watch on YouTube: Can I Get This Weird Japanese TV-PC Working Again? Revival Pt 2

Subscribe: Click here
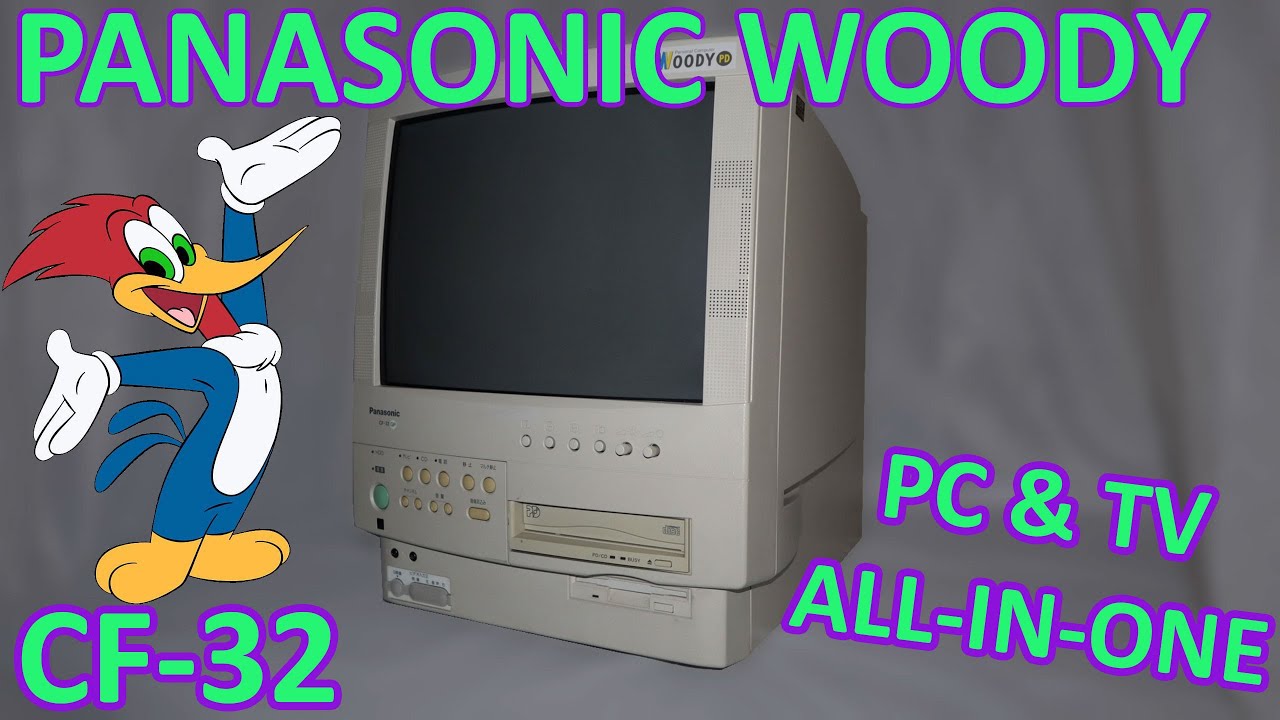
I Imported Japan’s Weirdest Multimedia PC (Panasonic Woody CF-32GP) Revival Pt 1

The Panasonic CF32, affectionately dubbed the “Woody,” is an all-in-one multimedia PC from the mid-90s that aimed to revolutionize the way we interacted with technology. Boasting a built-in TV tuner, a rare PDROM drive, and an ambitious vision of combining computing with entertainment, the Woody was a marvel of its time. However, its marketing campaign, which included the notorious slogan “Touch Woody, the Internet Hecker,” became one of the most spectacular failures in Japanese tech history, leading to the device’s swift removal from international markets. Despite this rocky start, the Woody CF32 remains a fascinating relic, showcasing Panasonic’s engineering prowess and multimedia ambitions.

Innovative Features and Technology

What set the CF32 apart was its groundbreaking technology for the era. The PDROM drive, a rewritable optical disc format capable of holding over 650 megabytes, was a significant advancement, predating technologies like CD-RWs and mini-discs. The CF32 was designed to be your computer, TV, stereo, and video recorder all in one, aiming to provide a seamless multimedia experience. With a full Japanese keyboard, video inputs for VHS and camcorders, and a custom sound card, the Woody was a trailblazer in multimedia integration that was, unfortunately, ahead of its time.

Inside the Panasonic Woody

Upon delving into the internals of the Woody, the speaker described the similarities it shares with IBM’s PS2 clone architecture. The device is powered by an AMD 486 DX4 CPU and features a custom motherboard, sound, and tuner cards, many of which are undocumented in tech archives. The speaker highlighted the unique components, such as a built-in SCSI controller and a custom video card, emphasizing the need to document these rare parts for retro tech enthusiasts. The challenge of reviving the Woody involves not only restoring the hardware but also preserving its software legacy.

Reviving the Woody CF32

Reviving the Woody presents its own set of challenges, particularly with the hard drive, which was initially seized and non-functional. The speaker undertook extreme measures to free the hard drive, ultimately succeeding in getting it to spin again. However, the restoration process revealed that Windows 3.1 was installed in Japanese, complicating efforts to upgrade to Windows 95. The speaker’s plan involves cloning the hard drive and attempting to install an English version of Windows while maintaining the original software for later exploration.

Next Steps and Future Plans

As the project progresses, the speaker aims to troubleshoot issues with the Woody’s controls and the CRT screen, which displays a purple tint. The goal is not only to restore functionality but also to enhance the overall experience by ensuring all components are operational. With the hard drive successfully cloned, the speaker is set to dive deeper into the intricacies of the Woody, exploring its features and uncovering potential upgrades. Viewers are invited to follow along in the next installment, where further discoveries and enhancements are anticipated.

In this video we share a short history of the Pansonic Woody CF-32GP and see if we can revive it.

Watch on YouTube: I Imported Japan's Weirdest Multimedia PC (Panasonic Woody CF-32GP) Revival Pt 1

Subscribe: Click here

This $5 Chip Turns a Quansheng UV-K6 Into a Shortwave Radio

Welcome back to the world of DIY radio modifications! In a recent video, the host introduced an exciting project that transforms the Quang Sheng UV-K6, a budget-friendly and hackable dual-band VHF/UHF analog radio, into a wideband receiver capable of picking up AM, FM, longwave, and shortwave signals. With the help of a simple $5 chip—the SI4732—this modification unlocks a new realm of listening possibilities, making it an intriguing project for radio enthusiasts and hobbyists alike.

Why Upgrade the Quang Sheng UV-K6?

The Quang Sheng UV-K6 is known for its affordability and potential for customization. However, its stock capabilities are relatively limited, primarily focusing on VHF and UHF bands. By incorporating the SI4732 chip, users can enhance their radio to receive a broader range of frequencies, including AM broadcasts from 520 to 1710 kHz and shortwave signals from 2.3 to 30 MHz. This upgrade opens the door to a diverse array of listening options, from international broadcasts to local AM stations.

The Modification Process

The modification process, while requiring some technical skills, is made accessible with clear instructions. The host walks viewers through disassembling the UV-K6, removing specific components, and delicately soldering the new chip onto the circuit board. Essential tools include a soldering iron, solder, and a bit of patience. After successfully installing the chip, the next step involves flashing new firmware onto the device, which enhances its user interface and functionality significantly.

Firmware and Features

Once the hardware modification is complete, users can upgrade the firmware to version 4.1, which introduces a more advanced user interface with better display options and additional settings. This firmware allows for customization of frequencies and even includes a hidden menu for advanced features. The host emphasizes the importance of following the instructions carefully to avoid any mishaps that could damage the radio, but reassures viewers that the process is rewarding and fun.

Final Thoughts and Future Projects

This DIY project is a fantastic way to breathe new life into an inexpensive radio, allowing hobbyists to explore various radio frequencies and enjoy a richer listening experience. The host also hints at potential future projects, including a version five modification that would involve adding an external antenna port. For those interested in electronics and radio communications, this project is not only a great introduction to radio modification but also a stepping stone to more complex endeavors.

In conclusion, the Quang Sheng UV-K6 modification is a testament to the creativity and resourcefulness of the DIY community. With just a small investment and some technical know-how, anyone can enhance their radio’s capabilities and enjoy the thrill of exploring the airwaves. If you’re inspired to try this project yourself, be sure to check out the resources and links provided in the video description!

In this video we add the SI4732 add-on pcb to get super wideband receive on the radio. We also upload a custom firmware.

Add-on board: https://www.aliexpress.com/item/1005006848009481.html

Quansheng UV-K5 Radio: https://www.aliexpress.com/item/1005006361757143.html

Firmware Download: https://github.com/phdlee/uvk5cec/releases/tag/v_01HF

Firmware Tool: https://egzumer.github.io/uvtools/

Music: Dance, Don't Delay – Twin Musicom

Watch on YouTube: This $5 Chip Turns a Quansheng UV-K6 Into a Shortwave Radio

Subscribe: Click here

Someone Melted The USB-C Port Into This Device

Welcome back to the bench! In today’s video, we dive into a rather intriguing repair job involving an Amazon special studio light. Our host highlights the light’s impressive brightness and its features, such as adjustable color temperature and brightness controls. However, a malfunction has occurred: the USB-C charging cable has melted into the device, causing a trip in the protection circuit of the wall charger. Thankfully, the charger was a reputable brand, equipped with safety features that prevented further damage.

An Unexpected Issue with the Charging Cable

The speaker shares a cautionary tale about the low-quality charging cable that contributed to the incident. Despite its frequent use, the cable’s durability proved to be inadequate, leading to its unfortunate melting. The speaker points out the potential pitfalls of opting for cheaper accessories, especially when it comes to technology that requires reliable charging. As they prepare for the repair, they contemplate various solutions, including the possibility of soldering a new USB-C connector or hardwiring the cable directly into the device.

Dismantling the Studio Light

The repair process begins with the speaker attempting to open the studio light. Without visible screws, they suspect the lens may be glued on, indicating that the device isn’t designed for easy servicing. Upon gaining access, they discover sizable lithium batteries, each rated at 2,000 milliamp hours, and express surprise at the relatively short battery life—less than an hour on full brightness. Marking the terminals for later reference, they note the clever design choice of sharing connections between the light and the battery.

Rescuing the Circuit Board

As the repair progresses, the speaker encounters a significant challenge: the melted USB-C connector is fused to the circuit board. Using a Dremel tool, they carefully separate the circuit board from the housing to assess the damage. Miraculously, the connector slides out without catastrophic loss, although a small trace does come off with it. Testing another inexpensive cable reveals it doesn’t work, prompting a search through stock for an appropriate replacement.

Final Touches and Success

With some ingenuity and a bit of soldering, the host manages to repair a broken trace on the board that connects to the power button. Their persistence pays off when the device begins charging again, saving the studio light from the brink of uselessness. With the light restored to functionality, the speaker expresses satisfaction at being able to continue using it to brighten their workspace.

The experience serves as a reminder of the potential risks associated with low-quality cables and the importance of choosing reliable products. As always, the speaker encourages viewers to subscribe for more engaging repair content in the future. Until next time!

Let's fix this rechargeable Studio Light with a melted USB C cable stuck to it.

Watch on YouTube: Someone Melted The USB-C Port Into This Device

Subscribe: Click here